
Setting Up Your Mac Pro
Your Mac Pro is designed so that you can set it up quickly and start using it right away.
Follow the steps on the next few pages to get started.
Step 1:
Position your Mac Pro and display.
Pick up your Mac Pro by both of its handles using correct lifting techniques. Use correct
lifting techniques when positioning your display as well. Position your Mac Pro and
display so that:
Â
They are each on a sturdy, flat surface
Â
The power cable connectors don’t press against a wall or other object
Â
The airflow in front of, behind, and below your Mac Pro and the display is
not obstructed
Â
The computer’s optical drive trays have space to open in front
The only way to shut off power completely to your Mac Pro and display is to disconnect
their power plugs from the power source. Make sure the power cords for your Mac Pro
and display are within easy reach so that you can unplug them.
12
Chapter 1
Ready, Set Up, Go
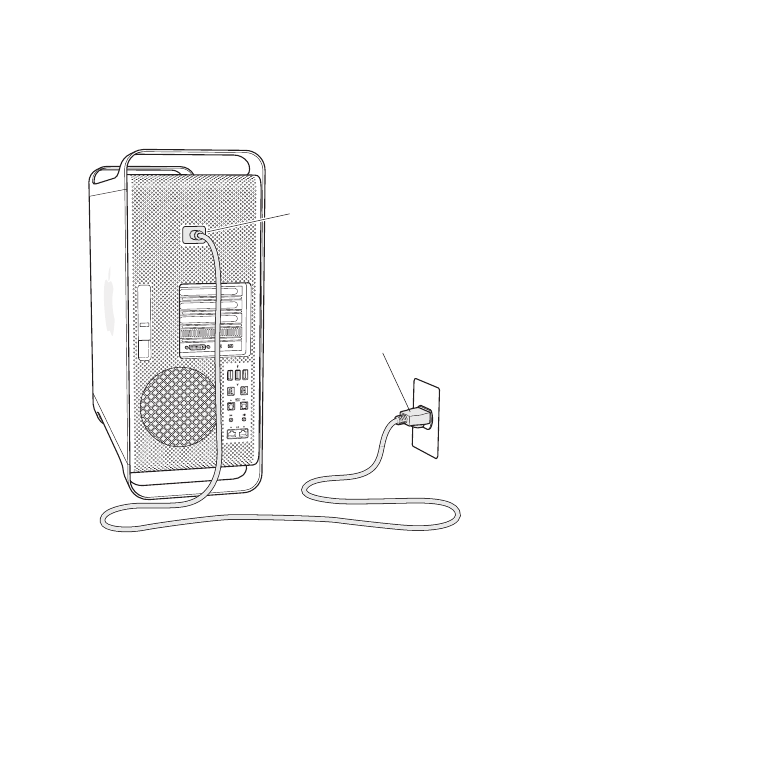
Step 2:
Plug in the power cord.
Plug the power cord completely into the recessed power cord socket on the back of
your Mac Pro and plug the other end into a grounded power outlet.
Power cord socket
Power cord plug
13
Chapter 1
Ready, Set Up, Go
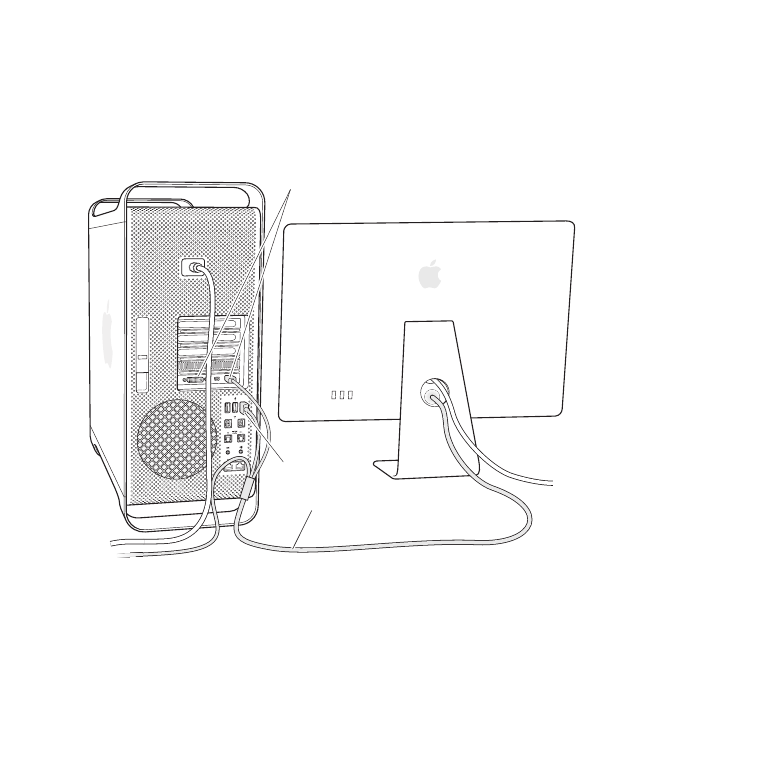
Step 3:
Connect the display.
Connect your display as shown below. Depending on the display, you may have one
or more cables to connect. Check the instructions that came with the display for
additional setup information.
Display cable
Display ports
USB port

14
Chapter 1
Ready, Set Up, Go
You can connect up to three displays with Mini DisplayPort or Digital Visual Interface
(DVI) connectors to the display ports on the back of your Mac Pro. The DVI display port
is a dual-link port, so you can connect a 30-inch Apple Cinema HD Display.
DVI display port
Mini DisplayPort (2)
You can also connect displays that have an Apple Display Connector (ADC) or a video
graphics array (VGA) connector using one of the following adapters:
Â
To connect a VGA display to the DVI display port or a Mini DisplayPort, use the Apple
DVI to VGA Display Adapter or the Apple Mini DisplayPort to VGA Adapter (both
available separately).
Â
To connect an ADC display to the DVI display port, use an Apple DVI to ADC Display
Adapter (available separately).
The Mini DisplayPort outputs provide both video and audio output. For example,
using a Mini DisplayPort to HDMI adapter and an HDMI cable, you can connect your
computer to an HDTV or AV receiver that has an HDMI connector and play both audio
and video. You must use the Sound pane in System Preferences to select the connected
device for audio output. For more information about connecting an HDMI device,
search for “HDMI” on the Mac Pro Support page at www.apple.com/support/macpro.
Display adapters and other accessories for your Mac Pro are sold separately at
www.apple.com/store.
15
Chapter 1
Ready, Set Up, Go
Step 4:
Connect an Ethernet cable or join a Wi-Fi network.
To access the Internet or a network using an Ethernet cable, connect one end of an
Ethernet cable to either of the Gigabit Ethernet ports on the back of your Mac Pro.
Connect the other end to a cable modem, DSL modem, or Ethernet network.
Gigabit Ethernet ports
16
Chapter 1
Ready, Set Up, Go
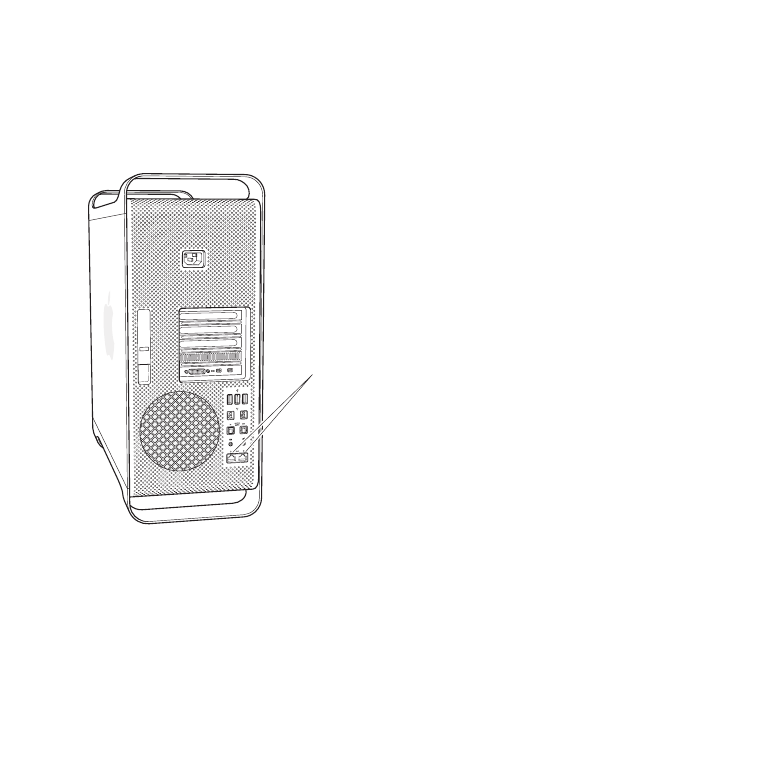
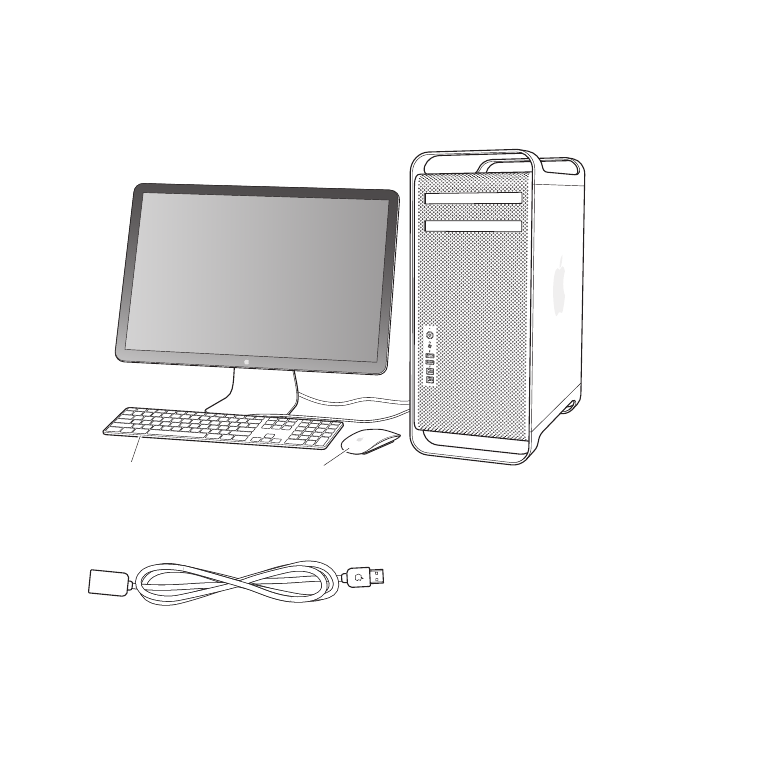
Step 5:
Connect the USB cable from your keyboard.
Connect the keyboard cable to one of the USB ports (d) on your Mac Pro or on
the display.
Mouse
Keyboard
If the keyboard cable isn’t long enough, use the keyboard extension cable that came
with your Mac Pro.
Apple keyboard extension cable

17
Chapter 1
Ready, Set Up, Go
Step 6:
Turn on your Apple Magic Mouse.
Slide the switch on the bottom of your Apple Magic Mouse to turn it on.
Your wireless mouse comes with AA batteries installed, and is already paired with your
Mac Pro. Pairing allows it to communicate wirelessly with your Mac Pro.
Indicator light
On/off switch
When you first turn on your mouse, the indicator light glows steadily for 5 seconds,
indicating the batteries are good. If your mouse doesn’t turn on, make sure the
batteries are installed properly and charged (see page 98).
The indicator light blinks until you turn on your Mac Pro and a connection is established.
If you purchased an Apple Wireless Keyboard or Magic Trackpad, follow the instructions
that came with the keyboard to set it up.

18
Chapter 1
Ready, Set Up, Go
Step 7:
Turn on your Mac Pro.
Press the power button (®) on the front of your Mac Pro to turn it on. If your display
must be turned on separately, turn it on by pressing its power button. Click your mouse
to establish a connection with your Mac Pro.
Note: If your mouse isn’t paired, follow the onscreen instructions to pair it with your
Mac Pro.
Step 8:
Configure your Mac Pro with Setup Assistant.
The first time you turn on your Mac Pro, Setup Assistant starts. Setup Assistant helps
you enter your Internet information and set up a user account on your Mac Pro.
You can transfer information from another Mac or PC during setup. You can also use
Setup Assistant to transfer information from a Time Machine backup or other disk.
You may have to update software if the other Mac doesn’t have Mac OS X version 10.5.3
or later installed. To migrate from a PC, you need to download Migration Assistant for
Windows from www.apple.com/migrate-to-mac.
After you start Setup Assistant on your Mac Pro, you can leave it midprocess without
quitting, move to the other computer if you need to update its software, and then
return to your Mac Pro to complete the setup.
If you don’t use Setup Assistant to transfer information when you first start up your
Mac Pro, you can do it later using Migration Assistant. Open Migration Assistant in the
Utilities folder in Launchpad. For help using Migration Assistant, open Help Center and
search for “Migration Assistant.”

19
Chapter 1
Ready, Set Up, Go
To set up your Mac Pro:
1
In Setup Assistant, follow the onscreen instructions until you get to the “Transfer
Information to This Mac” screen.
2
Do a basic setup, a setup with migration, or transfer information from a Time Machine
backup or other disc:
Â
To do a basic setup, select “Don’t transfer now” and click Continue. Follow the
remaining prompts to select your wireless network, set up an account, and exit
Setup Assistant.
Â
To do a setup with migration, select “From another Mac or PC” and click Continue.
Follow the onscreen instructions to select the Mac or PC you want to migrate
information from. Your Mac or PC must be on the same wired or wireless network.
You can also connect another Mac by using a FireWire cable and then restarting
it in target disk mode. To restart a Mac in target disk mode, restart the computer
while holding down the T key. After selecting your Mac or PC, follow the onscreen
directions for migrating information.
Â
To transfer information from a Time Machine backup or another disk, select “From a
Time Machine backup or other disk” and click Continue. Select the backup or the
other disk that you want to migrate information from, and click Continue. Follow the
onscreen directions for transferring the information.
If you don’t intend to keep or use your other computer, it’s best to deauthorize it from
playing music, videos, or audiobooks that you’ve purchased from the iTunes Store.
Deauthorizing a computer prevents any songs, videos, or audiobooks you’ve purchased
from being played by someone else, and frees up another authorization for use. For
information about deauthorizing, choose iTunes Help from the Help menu in iTunes.

20
Chapter 1
Ready, Set Up, Go
After you’ve set up your Mac Pro, check for updated software. Choose Apple () >
Software Update from the menu bar and follow the onscreen instructions.
Step 9:
Customize Your Desktop and Set Your Preferences.
You can easily make your desktop look the way you want using System Preferences.
Choose Apple () > System Preferences from the menu bar or click the System
Preferences icon in the Dock. System Preferences is your command center for most
settings on your Mac Pro. For more information, choose Help > Help Center and search
for “System Preferences” or for the specific preference you want to change.
Important:
You can set an option in Users & Groups preferences to help you reset
your login password if you forget it. You should set your password preferences soon
after setup.
Need Help Setting Up?
If you don’t see anything on your screen or you think your Mac Pro didn’t start up
properly, check the following:
Â
Is your Mac Pro plugged into a power outlet? If it’s plugged into a power strip, is the
power strip turned on?
Â
Is the power cord securely plugged into the back of your Mac Pro?
Â
Are the keyboard and display cables connected correctly?
Â
Are the brightness and contrast of the display adjusted correctly? If the display has
brightness controls, adjust them. If the display has a power button, make sure the
display is turned on.

21
Chapter 1
Ready, Set Up, Go
Â
If you still don’t see anything on your screen, restart your Mac Pro. Press and hold
the power button (®) on your Mac Pro for 5 or 6 seconds, until it turns off. Press the
power button (®) again to restart.
Â
If you see a blinking question mark on the screen or a series of flashes from the status
light, see Chapter 4, “Problem, Meet Solution” on page 81.